Star Trek: Discovery
Thursdays on Paramount+Star Trek: Discovery Season 1 Episode 13
What's Past is Prologue
Recap
[Originally aired January 28, 2018 on CBS All Access]
Having escaped his agony chamber, killed the Charon's captain, and revealed himself to be the Mirror-Lorca, intent on overthrowing the Emperor, Lorca finds his followers in their agony chambers and frees them all, including the Mirror-Landry.
They make their way to Engineering and find Mirror-Stamets hiding behind a holographic shield. Lorca recounts how he ended up in the Prime Universe, revealing that Stamets betrayed him to the Emperor, ruining the first coup attempt. When the Emperor tracked him down, she fired on his ship, the Buran, but an ion storm hit at the same moment as the torpedoes, causing a transporter malfunction which put him in the Prime Universe Buran. He demands Stamets show him the bio-weapon being developed for the Emperor.
Using the bio-weapon, Lorca begins killing whole decks of Imperial troops at a time. The Emperor monitors the casualties from her throne room and waits for him to reveal his location. Burnham warns against underestimating Lorca and asks to contact the Discovery again to warn them about the battle.
Emperor Georgiou orders her to be taken to the brig but she fights off the guards and escapes. While she is pursued by one set of guards, another is dispatched to bring Lorca to the throne room alive to be executed by the Emperor herself.
Aboard the Discovery, Stamets has repaired the spore drive but is unable to save the mycelial crop. He and Tilly have discovered that Mirror-Stamets is also using the mycelial network to power his ship, the Charon, but rather than traveling along the networks paths, he is sucking the power out of the network, poisoning it. If the contamination isn't contained and reversed, it will destroy the network throughout the multiverse.
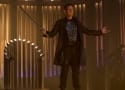
Lorca makes a ship-wide announcement, addressing the Emperor and accusing her of failing to preserve the Empire. He offers amnesty to everyone who renounces the Emperor and follows him. Also, he states that Michael Burnham is not to be touched. The Emperor uses the broadcast to track his location and orders her personal guard to follow her lead.
Entering the main lab, the Emperor is approached by Commander Owosekun who reports her squad was ambushed and destroyed and she was spared so that she could deliver Lorca's message to the Emperor that he was here. Just as she completes her message, she is disintegrated by a blast and Lorca and his forces makes themselves known. They fire but the Emperor's forces are protected by a containment field. The Emperor activates auto-fire cannons above the door and Lorca's group scatters for cover. He and Landry are able to take down the cannons and then they fire until the containment field falls. The Emperor signals retreat and Lorca detonates a flash grenade. The Imperial guard is downed and the Emperor takes out several rebels before initiating an emergency transport and beaming out.
Lorca is annoyed Stamets didn't warn him the Emperor had an emergency transport set up. Landry wants to kill Stamets but he is able to disable the ship's emergency transport. Lorca orders his troops to set up a perimeter around the throne room.
Burnham is in the ship's access tunnels and attempts to contact Discovery. Making contact, she informs Saru and the crew of Lorca's true identity and his plan to overthrow the Emperor. She implores them to abort the meeting with the Charon. Saru refuses to leave her behind. Stamets informs her of the damage to the network. They tell her that a photon hit on the Charon's orb would sever the connection but there's a containment field that they can't penetrate. Burnham tells them that she'll deal with the containment field.
Lorca and his troops enter the throne room. Lorca lectures them on Destiny. He tells Stamets that his usefulness is at an end and prepares to drop him through a hole in the floor into the mycelial orb that powers the ship. Instead, Landry shoots and disintegrates him.
Landry notifies Lorca that there's been an unauthorized ship-to-ship transmission and Lorca knows that it was Burnham.
Lorca addresses Burnham through the ship's video screens and she responds. He tries to convince her to join him while Landry hunts her down. She finds that the video feed was rerouted so they don't know where Burnham is. Lorca is convinced that she'll see things his way and join him.
Burnham finds the Emperor and they discuss Lorca. Burnham informs the Emperor that she plans on stopping Lorca but the Emperor is skeptical.
On the Discovery, Stamets is informing the crew that the photon torpedoes won't be enough to sever the orb's connection to the network. They'll need to load the ship's warheads with the harvested spores and use their entire supply, leaving them with no way home. On top of that, the simulations indicate that the force of the blast from freeing the network will incinerate the Discovery. Saru gives them a pep talk.
Landry reports to Lorca that all of the Emperor's lords and senior officers have been executed and everyone else is swearing allegiance. Burnham enters the throne room with the Emperor and bargains herself for the Discovery's crew. Lorca accepts.
Tilly and Stamets come up with a way for Discovery to not only save the ship but to get it home.
The Discovery rendezvous with the Charon. Lorca addresses them and Saru demands to know where Burnham is. Lorca informs them that she is staying by his side in order for the Discovery and its crew to escape annihilation. Saru wants to here is from Burnham who informs him she is where she needs to be. He takes that as confirmation that the plan is ready to execute and the Discovery fires on the throne room as Burnham and the Emperor attack their guards.
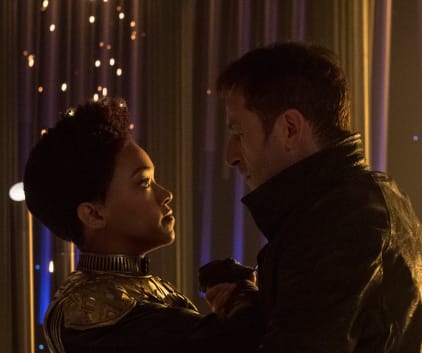
The Emperor takes on Lorca while Landry fights Burnham. Lorca knocks the Emperor down but diverts to kill Landry rather than let her harm Burnham. Burnham turns to attack him instead and Lorca hesitates from killing Burnham so she gains the upper hand on him. She tells him that Starfleet would've help him get home if he had asked. She lowers her weapon, saying that she won't kill him here either. The Emperor stabs him from behind with her sword. He stumbles towards Burnham who steps aside to let him fall to the ground. The Emperor opens the pit to the orb and kicks Lorca in.
Burnham brings down the containment field.
The Emperor fights Lorca's followers to buy Burnham time because she is a defeated leader but wants to die on her feet. She wishes Burnham well and hands her a communicator.
She contacts the Discovery as Emperor Georgiou takes on the Lorca forces. Discovery gets a lock on her and beams her out. At the last moment, Burnham runs to Georgiou and grabs her, bringing her with her to the Discovery. Once he knows that Burnham is on board, Saru orders the attack on the orb and black alert.
Everything goes according to plan and, with the help of the advice Culber gave him, Stamets is able to navigate them back into their universe and their quadrant. Unfortunately, they arrive nine months after they crossed over to the Mirror Universe and it appears that the Klingons have won the war and Starfleet no longer exists.
- Show:
- Star Trek: Discovery
- Season:
- Star Trek: Discovery Season 1
- Episode Number:
- 13